How to Make Undeletable Folder on your drive:
1. Press windows key and r (start-run)
2. type 'cmd' for command prompt
3. select your drive (eg: d:) and press enter
4. type 'md con\' and press enter
Now You have created the undeleteable
folder !
2. type 'cmd' for command prompt
3. select your drive (eg: d:) and press enter
4. type 'md con\' and press enter
Now You have created the undeleteable
folder !
How to delete it?
2. type 'cmd' for command prompt
3. select your drive (eg: d:) and press enter
4. type 'rd con\' and press enter now your folder will be delete .... !
:)
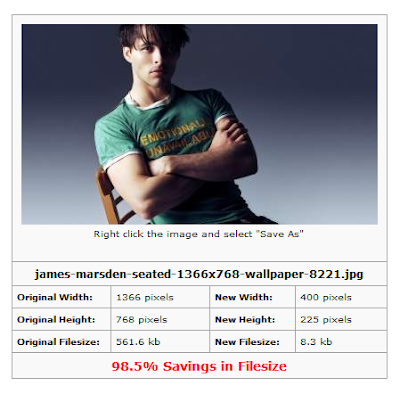
Compress and Resize your JPEG digital pictures at ease.Now you don't need to download or install any picture compressor software's on your PC to compress your pictures.JPEG-Optimizer has facilitated us with an online tool where you can compress your JPEG images without losing the picture quality.This would be the best solution when you heck up in sending large sized images through emails.Through this online tool you can easily compress and Resize your pictures.The steps to compress are clearly mentioned in the below image.
Steps:
1.Go to jpeg-optimizer.com
2.Upload your JPEG picture through Browse option.
2.Upload your JPEG picture through Browse option.
3.Set the compression level and the size you want to have for the picture.
4.Click on Optimize photo button.
In the resulted image you can see the compressed file size and the new dimensions of your picture.
5.Right click on the image and do save as on your PC.That's it :)
WordPress like Expandable search box will give a funky look to your blogger blog .Normally this type of search widgets you will see on WordPress sites.And this code will let you incorporate this WordPress search box in your blogger blog.
Steps to add expandable search box in Blogger
1.Go to Blogger Dashboard > Template > Edit HTML
2.Search (Ctrl+F) for the line ]]></b:skin> .
3.Now Copy the below code and paste it before the red highlighted line.
b.You can also change the default size of the search box by altering width:180px; and can change the expandable length by changing the width:210px;
c.To change the border color you can replace this line (border-color:#0b5394#0b5394 #0b5394#0b5394;) with your desired color codes.
4.Now go to Blogger > Layout>Select HTML/JavaScript widget. Paste the code below inside it .
5.Click on save and you are done:)
/*******************************************
SEARCHBAR-http://genuinecontent.blogspot.com
********************************************/
#searchform{
float:right;
margin: -5px 20px 0 0;
SEARCHBAR-http://genuinecontent.blogspot.com
********************************************/
#searchform{
float:right;
margin: -5px 20px 0 0;
}
#searchbox{
height: 24px;
text-align:center;
padding-top: 5px;
background: #ffffff url(https://blogger.googleusercontent.com/img/b/R29vZ2xl/AVvXsEg_NpgJ8nPVv8pDtyU7TLGd6Qm3BqU49evTMFiLMhZth6suBYJ7QN4Jc92oWY9Jza8ATtTkO5VtfMv6OAMgjIJEPxQgfV8VXk2Id6Z8IeLdY1vK6NzVdTo07HGt1NgWpgyxzi65eGzRPBVq/s0/subtle_freckles.png.png) repeat;
font-size:small;
color:#0b5394;
padding:1px 2px;
width:180px;
border-width:2px;
border-style:solid;
border-color:#0b5394 #0b5394 #0b5394#0b5394;
outline:none;
float:right;margin-right:5px;
-moz-transition: all 0.5s ease-out;
-o-transition: all 0.5s ease-out;
-webkit-transition: all 0.5s ease-out;
-ms-transition: all 0.5s ease-out;
-moz-border-radius:8px 8px 8px 8px;
-khtml-border-radius:8px 8px 8px 8px;
-webkit-border-radius:8px 8px 8px 8px;;
border-radius:8px 8px 8px 8px;
}
#searchbox:focus{
width:210px;
color:#000000;
}
-khtml-border-radius:8px 8px 8px 8px;
-webkit-border-radius:8px 8px 8px 8px;;
border-radius:8px 8px 8px 8px;
}
#searchbox:focus{
width:210px;
color:#000000;
}
Customization:
a.If you want to change the background image for the search box then just replace the existing image URL (https://blogger.googleusercontent.com/img/b/R29vZ2xl/AVvXsEg_NpgJ8nPVv8pDtyU7TLGd6Qm3BqU49evTMFiLMhZth6suBYJ7QN4Jc92oWY9Jza8ATtTkO5VtfMv6OAMgjIJEPxQgfV8VXk2Id6Z8IeLdY1vK6NzVdTo07HGt1NgWpgyxzi65eGzRPBVq/s0/subtle_freckles.png.png )with your image URL.And if dont want ant image background then remove this line from the code url(https://blogger.googleusercontent.com/img/b/R29vZ2xl/AVvXsEg_NpgJ8nPVv8pDtyU7TLGd6Qm3BqU49evTMFiLMhZth6suBYJ7QN4Jc92oWY9Jza8ATtTkO5VtfMv6OAMgjIJEPxQgfV8VXk2Id6Z8IeLdY1vK6NzVdTo07HGt1NgWpgyxzi65eGzRPBVq/s0/subtle_freckles.png.png) repeat .b.You can also change the default size of the search box by altering width:180px; and can change the expandable length by changing the width:210px;
c.To change the border color you can replace this line (border-color:#0b5394#0b5394 #0b5394#0b5394;) with your desired color codes.
4.Now go to Blogger > Layout>Select HTML/JavaScript widget. Paste the code below inside it .
<li><form action='/search/' id='searchform' method='get' style='display:inline;'>
<input id='searchbox' maxlength='240' name='q' onblur='if (this.value == "") {this.value = "Search Here...";}' onfocus='if (this.value == "Search Here...") {this.value = ""}' type='text' value='Search Here...'/>
</form> </li>
<input id='searchbox' maxlength='240' name='q' onblur='if (this.value == "") {this.value = "Search Here...";}' onfocus='if (this.value == "Search Here...") {this.value = ""}' type='text' value='Search Here...'/>
</form> </li>
5.Click on save and you are done:)
How To Add Pinterest Button To Blogger Blog.Pinterest pin it button next to your blog post title would be an eye catching and easily noticeable to your blog readers.This pin it button will allow you readers pin your post image on Pinterest along with your blog post link as a back link.Hence,Pinterest users who click on your pinned image will be redirected to your blog post.
How To Add Pinterest Button Near Blogger Post Title
1.Go to Blogger Dashboard > Template > Edit HTML
2.Search (Ctrl+F) for the line <a expr:href='data:post.url'><data:post.title/></a> .
3.Now See the below code ( highlighted in gray) and paste it next to the above red highlighted line as shown in the below image.
Note:To have a space between post title and pin it button just enter 3 empty spaces as shown in the picture above.
4.Click on save template button and your are done.


